Editing Archive Film using Premiere Pro
What are sequences in Premiere Pro? A sequence in the Adobe Premiere Pro software is where you have all your clips, layers, and objects. This is where you stitch them all together to make a completed project.
What is the difference between a project and a sequence in Premiere Pro? By creating a “project” you are making a place to import all your assets and a place to edit your sequences.
Before you open Premiere Pro create a folder on your desktop and name it. Put all video and audio you plan to use for your short film in that folder. When you save, make sure your file is saved in the folder along with your video/audio. This is important because if all files are not together and you try to open the project file a red gradient will appear saying “media offline”. Don’t be alarmed if there is a yellow gradient saying “media pending” when you open up your saved file on a different computer. All it means is the program is loading all the video files and effects you have on them.
What is a scratch disk?
This is where all your video stuff is stored while you are using the program, and should be thought of as storage.
If you want to preview any of your edits, timelines, effects or transitions you have to render them. (this means your edits are being applied to the clip). All of the rendered clips are then stored on the scratch disk as a preview file. When you first open Premiere Pro and it asks you to “make a new project” a small window will pop up. There are two tabs “General” and “Scratch Disks”. The “General” settings should be fine at what they are set and the “Scratch Disks” settings will automatically be set to “same as project”. What this means is that the scratch files will be stored in the same folder as your project..
You have two other options – “my documents” (this means that the files will be stored in your “my documents”folder) and “custom” (this means that you want it saved/stored in a place of your choosing. You will need to select “browse” to specify your available disk location). Just remember that no matter which option you choose all of your files and saved files are together.
“Project” and “Sequence”
There is a difference between the two and you should use both. By creating a “project” you mae a place to import all assets and a place to edit your sequences.
A “sequence” is where you edit your clips. You can have more than one sequence in a single project.
Creating multiple sequences can break down a more complex project into smaller steps. If you want to make a short film, you can have a sequence for the intro, one for the film itself, and one for the ending credits.
You can create a “new sequence” in the top or you can right click on one of your video files and select “new sequence” in the top or you can right click on one of your video files and select “new sequence from clip”. This will set the dimensions the same as the original video file.
Keyboard Shortcuts
The keyboard shortcuts can save a few seconds. Instead of searching the internet for Adobe Premiere keyboard shortcuts, click in the bold “Premiere Pro” option next to “file” and select keyboard shortcuts. This will open a small window that has all of the keyboard shortcuts which you can view at anytime.
Creating a Title
If you select “title” from the toolbox at the top of the screen, a small window with more options will appear. There are three types of titles you can make default, still, roll and crawl. You can see your video underneath while the title is being created and use fonts downloaded from the internet.
Unlinking Files
If you use the razor tool to cut your video, it will also cut your audio. This means where you cut the video the audio will be cut in the same spots. If you want the video and have the audio play straight through, right click on the clip in the timeline and select the “unlink” option. Now you can freely edit the audio and video separately.
Colour Labelling
If you have a lot of video to edit, changing the colour of the clip in the timeline can help organise the project. Just right click on the clip, select “label” and pick your colour.
Speed/Duration
To change the timing of the video footage, right click on the clip in the timeline and select “speed/duration”. This will change the length of your clip. You can have the option to keep the original pitch and reverse the clip speed.
In Premiere Pro, you create clips by importing files, duplicating clips, or making sub-clips. You create a clip instance by using a clip in a sequence.
Source clips, clip instances, sub-clips, and duplicate clips
In Premiere Pro a clip points to a source file. Trimming a file, or editing it in anyway does not affect the source file. For example if you import a 30 minute clip that points to that source file. If you trim the clip to a 5 minute duration the 30 minute source file remains on your hard disk.
I used a tutorial on Youtube called Premiere Pro Tutorial for Beginners 2022-Everything You Need to Know (Updated)
I made notes to help me.
I started by creating a new project. I named it and added the location of where the file was going to go, which was the Premiere Pro Folder on my Onedrive on my desktop at uni and clicked ok.
I then created a new sequence by right clicking and finding a new item and then sequence. I went on to settings and editing mode, then custom. I then selected 25,00 frames/second, the frame size 1920 and the horizontal 1080. The pixel aspect ration is square pixels (1.0) and I created a name for the sequence (at the bottom) and clicked ok.
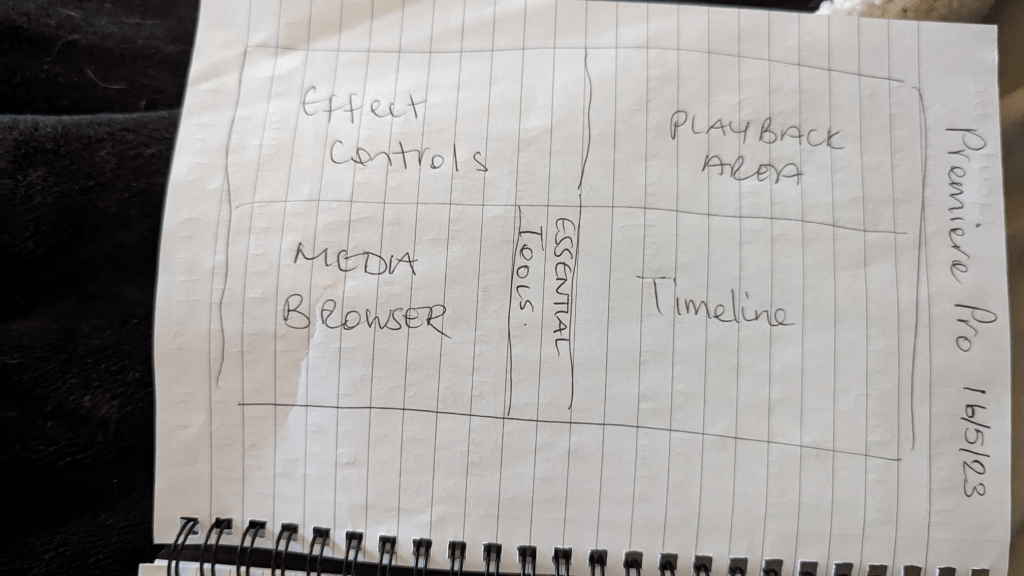
Where the information you need is located when working in Premiere Pro.
It is important to stay organised by creating folders for your content and store in the project library. It is possible to drag and drop into the relevant folder.
Premiere Pro has workspaces which are different kinds of software layout pre-sets for different kinds of tasks that you are going to be doing inside Premiere Pro.
Click top right hand corner (next to export icon), a drop down menu appears and click editing.
You can import media to the timeline (audio as well).
At the bottom left of your screen select the clip that you want and drag and drop it (below play back box), video track and press play.
Another way is to double click and in your source monitor you will be able to skim through it before you import it.
If you only want to import a certain part of the video/audio you can come to the part that you want to import and press ‘I’. Set in point on your keyboard and then scroll to where you want it to end, press ‘O’ on your keyboard, set out point.
Click on the screen and drag and drop to timeline, main parts and sections.
Sequence and Timeline Panel
Essential tools for editing (central rectangular panel) left bottom project library and playback panel.
Effect control panel-set parameters of your clips.
Overview of Essential Tools
Select Tool (Head of an Arrow) custom shortcuts using keyboard shortcuts (top Premiere Pro).
Razor Tool (below the select tool) You can make cuts to your video click on it and you can delete a section.
Shift and delete creates a ripple delete, which takes away the space in-between.
How to Speed Up or Slow Down Clips
Select the clip and right click on it speed/duration. Click on speed/duration on drop down menu and set your speed percentage and click ok. You can use the same selection to go up or down.
How to Add Effects and Transitions
Go to the effects tab or effects workspace on the drop down menu.
If you want to create a transition between clips Premiere Pro already has some transitions installed. It is possible to drag and drop the transition between two clips.
To change the length of a transition it is possible to zoom in and select the transition and drag it to make it shorter or longer or you can select it and go to the effects panel and set the duration of it and the same for other transitions.
If you don’t want to add a transition but an effect go to video effects select the effect that you want and drag and drop it on to the clip, nothing has changed yet because you need to go to the effect controls and you can see the effect you have selected and you can change some of the settings. If you want to delete an effect from a clip you can go the effects panel select it and press delete on the keyboard. The same would be for audio effects in audio transitions.
How to Add Text
Go to drop down menu on the right and click on workspaces captions and graphics. You have the essential graphics tab open click on the type tool, the shortcut is ‘T’ on your keyboard, click on screen, type in what you want and make changes to the text in essential graphics tab. The text and size of the font can be changed, bold and the tracking of the different letters.
Where you have added text the software has automatically created a new layer so when you click on it you can stretch it out or make it shorter.
Adding Audio to Your Video and Songs
It is possible to store your audio files in your library. Select, drag and drop on your timeline.
It is possible to add sound effects by dragging and dropping as well.
It is also possible to to change the positioning or add it to another track by making the audio track bigger and alter the volume and clicking on to one of the white sound lines. Select it and go to effects controls at the top and change the volume level.
Colour Grading Effects to Your Footage
From the project library, right click, click on new item, create a new adjustment layer, make sure you have the same settings as your sequence and click ok. You can drag and drop it to your timeline and make it cover all of the footage that you want it to effect, you can then go to your colouring workspace and look up tables to colour your clips fast they are Instagram filters for your videos.
LUT
Go to creative drop-down menu and choose a LUT that you want to use, it is possible to change the intensity.
Enable and disable Adjustment Layer Control
You can also right click on it and click on ‘enable’ or ‘disable’ and you can see the before and after.
Exporting Footage
Select your entire sequence and press ‘I’ on your keyboard set in point at the beginning of your timeline and you want to come to where your video will end and then press ‘O’ set out point on your keyboard. If you messed up you can right click, clear in and out and then re-do the whole process you then need to go to export and name the file, choose the location (where it will be stored on your computer). You can set your pre-set and your export settings (the format) make sure it is selected on source (drop-down menu below playback). SELECTED ON SOURCE IN AND OUT make sure source and output settings match especially on the resolution and frame rate size, click on export and it will export the clip.
